Chapter VI
GENERAL CONSTRUCTION AND EMPLOYMENT OF THE WIRELESS SET 9-P
(Please note: due to the large number of cryillic characters in
this section, I have used the closest Latin characters to make converting this
section easier)
General Description (Plate 54)
The purpose of the wireless set 9-P
is for maintaining radio telephonic communication between the tank section and
the separate tanks.
The rod aerial is 4 metres high.
The frequency of the transmitter is 4050 to 5625 kg.cy (??Hz??) (74 to 53.3
meters).
The range of the set is 18 km on the move and 25 km when stationary.
The Wireless set is designed to work with the intercom sets Tny 3 and Tny 4
BNC. The current supply for the set comes from the 12V circuit and the current
supply for the intercom from the transformer -10.

Plate
54 - Wireless installation 9-P
1. Receiver
2. Transmitter
3. PYH-10 Transformer with
filter
4. PYH-30 Transformer with filter
5. Panel |
6. Shock-absorbing pad of receiver
7. Shock-absorbing pad for
'transformer
8. Aerial holder
9. Case for rod aerial
10. Spares
box. |
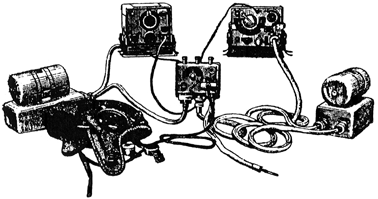
Main Parts of Wireless Set (Plate 55)
1. Transmitter with
shock-absorbing pad.
2. Receiver with shock-absorbing pad.
3.
Transformer PyH-30 with filter.
4. Transformer PyH-10 with filter and two
cables leading to panels and to receiver.
5. Control panel with feed cable
(connecting the 12V circuit) and with telephonic flex (to receiver).
6.
Headset with accessories (telephones, throat microphone, flex with forked
plug}.
7. Cable connecting the feed plug of the transmitter to the left hand
plug of the transformer PyH-30.
8. Cable connecting the middle plug of the
panel to the right plug of the transformer PyH-30.
9. Aerial assembly
consisting principally of a shock absorber and four equal lengths of rod.
10. Box of spare parts.
Plate
55 - Wireless Set 9-P
Inspection, Testing and Preparation of the Set
Before using the
wireless set it must be tested and prepared.
The main parts of the wireless set as described above must be checked over
separately and afterwards the set should be prepared in the following order
:-
1. Fit the rod aerial and at the same time test its joints for tightness
also test the terminals and leads to the transmitter and receiver for tightness
and insulation.
2. Inspect the aerial insulator and clean off mud and dust.
3. Test for tightness the terminals of the leads from the aerial to the
terminal "B" on thee panel and the connections between the terminals "A" and
"Arl" on the panel of the receiver and transmitter.
4. Test and screw up the
thick nut of the contact plugs of the current supply plugs.
5. Check the
transformers paying special attention to the travel of the armature, cleanliness
of the commutator and the size of the brushes. Replace worn brushes and rub new
brushes.
6. Put on headset and see that telephones rest over the ears and
that the throat microphone does not press too tightly against the throat.
7.
Check the firmness of the transmitter, receiver and control panel. Test the
transmitter indicator lamp.
8. Try out the aerial for receiving on three
different frequencies.
9. Switch on the receiver and test it on the
frequency. Then time (??tune??) the transmitter and reciever with the correct
frequency.
TUNING THE TRANSMITTER
1. Raise the lever of the keeper on the
transmitter handwheel and set the indicator needle over the ordered frequency
then replace the keeper.
2. Set the switch on the panel to "nPII" (Transmit)
than start the transformer PyH-30.
3. Set the tumbler switch on the panel to
"BKH" and allow the transmitter to warm up for a minute.
4. Unscrew the
keeper of the aerial tuning handwheel and by turning the handwheel find the
maximum brilliance of the lamp.
5. Set the main switch to "nPM" (Receive)
and than tune the receiver.
TUNING THE RECEIVER
1. The switch on the panel should be at "BKI"
and the change-over switch to "nPM" (for this it is necessary to rotate the
transformer PyH-10).
2. Turning the volume control knob with the inscription
"TIIWIE-TPOM4C" (soft -loud) through the clock dial graduations up to its step
(in half a minute it should be possible to hear a faint noise in the telephone).
3. Set the "HaCTPOHKA" (Tuning) knob of the reciever against the ordered
frequency and obtain the boost volume for receiving the signals by slowly
turning the knob.
4. By means of the knob "TIIWIE-TPOM4C" (soft -loud)
establish the required volume.
5. After carrying out the above actions, the
wireless set is fully prepared for use.
Basic Rules for Using the Wireless Set
1. Messages should be
transmitted in short, clear and concise words without hurrying.
2. After
speaking, quickly move the switch to "nPIIEM" (Receive).
3. Make sure that
the throat microphone is correctly secured to the neck.
4. Do not have too
great a volume (otherwise the wireless operator will be quickly exhausted and
deafened).
5. After communication has ceased it essential to switch off the
current supply by means of the tumbler switch.
INTERCOMMUNICATION SYSTEM
In T-34 tanks the internal communication
system Tny-3 is fitted. In later models Tny-48IIC is fitted.
The purpose of the Tny-3 is for telephonic and signal communication between
three of the crew and to link up the commander and wireless operator to the
wireless set. It consists of the following instruments :-
1. Tank
Commander's set.
2. Wireless operator's set.
}. Driver's set.
4.
Three headsets type TrW.
5. Three microphones of type MA (with button).
6. Connecting cable.
7. Set of spares and instruments.
The telephone sets of the commander and driver have similar electrical
circuits as well as being interchangeable.
Parts of the intercom set Tny-3
The commander's No.1 set provides.
Intercommunication to all the crew and also can be used for receiving and
transmitting through the wireless operator's set. On the front of this set is
situated a button for calling the driver and wireless operator; here is also
fixed red lamp for receiving and calling. On the left there are three plug
sockets, the first with three holes for the microphone, the second with two
holes is for the telephone and the third with one hole is for the additional
microphone prong.
The No.2 set of the wireless operator provides intercom to all the crew and
also to link the tank commander to the wireless. On the right it carries three
plug sockets, one with three holes for the microphone, the second with one hole
is for connecting the additional prong of the microphone and the third with
holes for the telephone. Below it has a switch with three positions: "set to
self" (PdIHOAI9I Ceb9), "Intercom" (BHyTPCIUdh C6936) and "set to No.1" (PdIINo
IIR No.1). On the left there is a metal cover over a plate with six screws to
which are secured the cables leading to the wireless set.
The No.3 set of the driver provides intercom to the members of the crew. The
arrangement of No.3 set is exactly similar to No.1 set.
TO USE THE Tny-3
1. Switch on the current by means of the tumbler
switch on the wireless set panel.
2. Clear signals can be obtained on the
wireless operator's set by pressing the button while the switch is in any
position, and also on the other sets by engaging and partly or fully
disconnecting the telephones and microphones. The sending of signals is
indicated by the red lamp on the calling set.
3. For speaking on the
telephone, the microphone button must remain pressed.
4. For transmitting
and receiving on the wireless set the wireless operator must move his switch to
the position "set to self", and to connect the commander to the wireless set he
must move the switch to the position "set to No.1". During the transmission over
the wireless set, the button must remain pressed.
5. When conversation or
communication on the wireless set is finished the button on the microphone must
be released.

